Video Demo:
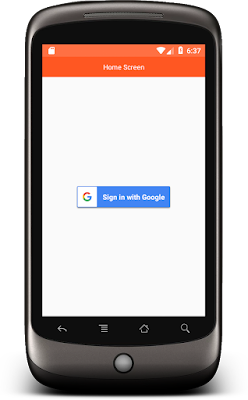
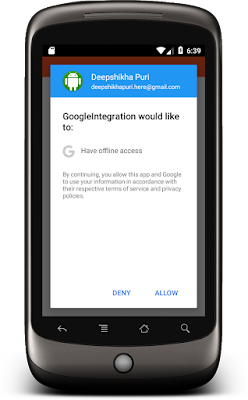
Firebase provide a authentication facility to a application or web user to login with their Facebook, Google, Twitter etc account. In this article, I would like to talk about Google Authentication using Firebase in react native android application. DOWNLOAD SOURCE CODE FROM HERE.
Project Setup Steps->
Step 1-> To create your project run this command:
Step 2->
Now initialise your project name. Replace your project name with MovingScreen:
Step 3->
Now Intall Firebase google login library in your react native project
Step 4>
Link your Firebase Google Signin library with your project
Firebase configuration for Android
Step 1>
Open your firebase console (https://console.firebase.google.com/)
Step 2>
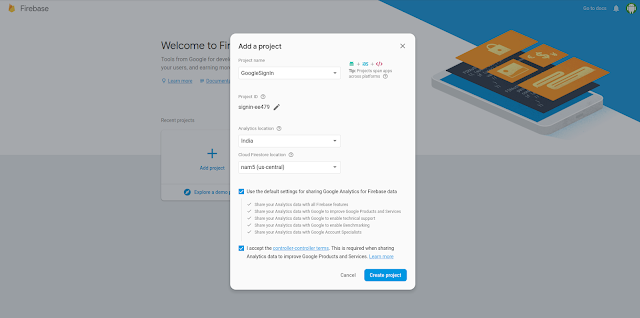
Add your Project details in Firebase
Step 3>
Enable Google Login in Firebase Console
Path ProjectOverview->Authentication->Google

Step 4>
Add the SHA key and package name of your project in Firebase Console

Step 5>
Download your google-services.json from firebase console
Now setup the firebase dependencies and json file in your Android project
Step 1>
Add google service classpath in your android Project
Path ProjectName->Android-> build.gradle

Step 2>
Add google service plugin in your android Project
Path ProjectName->Android->app-> build.gradle

Step 3>
Add google-services.json in your android Project
Path ProjectName->Android->app-> google-services.json
Now you can start work on your React native project
HomeScreen.js:
Download source code from here
Firebase provide a authentication facility to a application or web user to login with their Facebook, Google, Twitter etc account. In this article, I would like to talk about Google Authentication using Firebase in react native android application. DOWNLOAD SOURCE CODE FROM HERE.
Project Setup Steps->
Step 1-> To create your project run this command:
sudo npm install -g react-native-cliStep 2->
Now initialise your project name. Replace your project name with MovingScreen:
react-native init MovingScreen Step 3->
Now Intall Firebase google login library in your react native project
yarn add react-native-google-signin
Step 4>
Link your Firebase Google Signin library with your project
react-native link react-native-google-signin
Firebase configuration for Android
Step 1>
Open your firebase console (https://console.firebase.google.com/)
Add your Project details in Firebase
Step 3>
Enable Google Login in Firebase Console
Path ProjectOverview->Authentication->Google

Step 4>
Add the SHA key and package name of your project in Firebase Console

Step 5>
Download your google-services.json from firebase console
Now setup the firebase dependencies and json file in your Android project
Step 1>
Add google service classpath in your android Project
Path ProjectName->Android-> build.gradle
classpath 'com.google.gms:google-services:4.2.0' // <--- use this version or newer

Step 2>
Add google service plugin in your android Project
Path ProjectName->Android->app-> build.gradle
apply plugin: 'com.google.gms.google-services' // <--- this should be the last line

Step 3>
Add google-services.json in your android Project
Path ProjectName->Android->app-> google-services.json
Now you can start work on your React native project
HomeScreen.js:
import React ,{Component} from 'react'
import{StyleSheet,View,Text, StatusBar,Image,Button} from 'react-native'
import {GoogleSignin, GoogleSigninButton,statusCodes} from 'react-native-google-signin'
export default class HomeScreen extends Component {
state ={ userDetails:'', GoogleLogin:false, }
render(){ return( <View style={styles.container}> <StatusBar backgroundColor='#FF7043'></StatusBar>
<View style={styles.headerContainer}> <Text style={styles.headerTxt}>Home Screen</Text> </View>
<View style={this.state.GoogleLogin? {display:"none"}:styles.signinContainer}>
<GoogleSigninButton style={{width:192, height:50}} size={GoogleSigninButton.Size.Wide} color={GoogleSigninButton.Color.Dark} onPress={this.signIn}> </GoogleSigninButton> </View>
<View style={this.state.GoogleLogin? styles.userDetailContainer: {display:'none'}}> <Image style={styles.userImage} source={{uri: this.state.userDetails.photo}}></Image> <Text style={styles.txtEmail}>{this.state.userDetails.email}</Text> <Text style={styles.txtName}>{this.state.userDetails.name}</Text> <Button color="#FF5722" title='Logout' onPress={this.signOut}></Button>
</View> </View> ) }
signOut = async()=>{ try{ await GoogleSignin.revokeAccess(); await GoogleSignin.signOut() this.setState({ userDetails:'', GoogleLogin:false, } ) }catch(error){ console.log(error.toString()) } }
signIn = async () => { try { await GoogleSignin.hasPlayServices(); const userInfo = await GoogleSignin.signIn(); console.log('User Details', JSON.stringify(userInfo))
this.setState({ GoogleLogin:true, userDetails:userInfo.user,
})
} catch (error) {
this.setState({ GoogleLogin:false, })
if (error.code === statusCodes.SIGN_IN_CANCELLED) { console.log("Cancel ", statusCodes.SIGN_IN_CANCELLED ) // user cancelled the login flow } else if (error.code === statusCodes.IN_PROGRESS) { console.log("InProgress ", statusCodes.IN_PROGRESS ) // operation (f.e. sign in) is in progress already } else if (error.code === statusCodes.PLAY_SERVICES_NOT_AVAILABLE) { console.log("Not Available ", statusCodes.PLAY_SERVICES_NOT_AVAILABLE) // play services not available or outdated } else { console.log("Error ", error) } } };
}
GoogleSignin.configure({ scopes: ['https://www.googleapis.com/auth/drive.readonly'], // what API you want to access on behalf of the user, default is email and profile webClientId: '602222878267-1ki3ucs1nso4t4scrnh5mem9sr6mjd20.apps.googleusercontent.com', // client ID of type WEB for your server (needed to verify user ID and offline access) offlineAccess: true, // if you want to access Google API on behalf of the user FROM YOUR SERVER hostedDomain: '', // specifies a hosted domain restriction loginHint: '', // [iOS] The user's ID, or email address, to be prefilled in the authentication UI if possible. [See docs here](https://developers.google.com/identity/sign-in/ios/api/interface_g_i_d_sign_in.html#a0a68c7504c31ab0b728432565f6e33fd) forceConsentPrompt: true, // [Android] if you want to show the authorization prompt at each login. accountName: '', // [Android] specifies an account name on the device that should be used // iosClientId: '<FROM DEVELOPER CONSOLE>', // [iOS] optional, if you want to specify the client ID of type iOS (otherwise, it is taken from GoogleService-Info.plist) });
const styles = StyleSheet.create({ container:{ flex:1 },
headerContainer:{ width:'100%', height:40, justifyContent:'center', backgroundColor:'#FF5722', },
headerTxt:{ fontSize:13, color:'white', alignSelf:'center' },
signinContainer:{ flex:1, justifyContent:'center', alignItems:'center', },
userDetailContainer:{ flex:1, width:'100%', alignItems:'center', justifyContent:'center' },
userImage:{ width:100, height:100, },
txtEmail:{ color:'black', marginTop:10, fontSize:13, },
txtName:{ color:'black', margin:10, fontSize:13, }
})
Download source code from here
.png)


Why is Python full stack development in high demand?
ReplyDeletePython is an object-oriented programming language, high-level with dynamic interpretation. It supports packages and modules which allow for program modularity and code reuse.
Here are some reasons why python full stack developer has high demand
Python's dense syntax and readability allow developers to express concepts with greater ease.
It allows developers to focus on core functionality and takes care of all programming tasks.
Programming language codes can be written more quickly and efficiently than in other languages.
After looking at all these points, I can see that all three technologies can be improved, but Java is my favourite.
Read More - https://eiliana.com/blogitem/why-businesses-tend-to-hire-python-full-stack-developer