Deepshikha Puri, the young Indian Entrepreneur heading the mobile development trade from years to successive extent, has worked with numerous clients and many tremendous brands in this industry of mobile encompassing in India and overseas maintaining promising work relationships with each of them with an impression to manage it's whole thing.

Wednesday, March 20, 2019

Video Demo

Many times in react native we need to fetch data from a server end. In this tutorial we will learn how to call the rest api's in React Native. DOWNLOAD SOURCE CODE FROM BELOW
api integration in react native rest api integration in react native

STEPS TO CREATE A REACT NATIVE PROJECT:

Step 1-> To create your project run this command:
sudo npm install -g react-native-cli
Step 2-> 
Now initialise your project name. Replace your project name with MovingScreen:
react-native init MovingScreen
Now you can start work on your React native project

HomeScreen.js
import React ,{Component} from 'react' import {View,Text,StyleSheet, FlatList, ActivityIndicator} from 'react-native'
export default class HomeScreen extends Component{ state={ response:'', loading:false, }
customListView(rowdata){ return ( <View style={styles.itemContainer}> <Text>{rowdata.item.name}</Text> <Text>{rowdata.item.email}</Text> <Text>{rowdata.item.phone.mobile}</Text> </View> ) }
customListViewDivider(){ return( <View style={styles.dividerContainer}></View> ) }
componentDidMount(){ this.setState({ loading:true, }) this.fetchData() }
fetchData(){ fetch('https://api.androidhive.info/contacts/') .then((response)=> response.json()) .then((responsjson)=>{ this.setState({ response:responsjson.contacts, loading:false, })
}) .catch((error)=>{ console.log("error ",error.toString()) this.setState({ loading:false, }) }) }


render(){ return( <View style={styles.container}> <View style={styles.headerContainer}> <Text style={styles.headerTxt}>Home Screen</Text> </View> <FlatList data={this.state.response} renderItem={this.customListView} keyExtractor={(item, index) => index.toString()} ItemSeparatorComponent={this.customListViewDivider} ></FlatList> <View style={this.state.loading? styles.loaderContainer: {display:"none"}}> <ActivityIndicator animating={true} size='large' color='#FFFFFF'></ActivityIndicator> </View> </View> ) } }
const styles = StyleSheet.create({ container:{ height:'100%', position:'relative' },
headerContainer:{ height:40, width:'100%', backgroundColor:'#FF7043', justifyContent:'center', alignItems:'center' },
headerTxt:{ fontSize:13, color:'white', },
dividerContainer:{ height:1, width:'100%', backgroundColor:'#EAEAEA' },
itemContainer:{ flex:1, paddingLeft:10, justifyContent:'center', width:'100%', height:100, },
loaderContainer:{ height:'100%', opacity:0.8, width:'100%', backgroundColor:'#000000', position:'absolute', justifyContent:'center', alignItems:'center' }
})


DOWNLOAD SOURCE CODE FROM HERE

Tuesday, March 12, 2019

Video Demo:

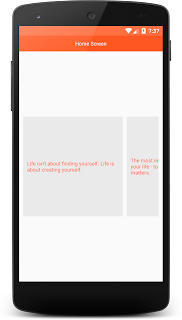
Basically a Flatlist is a view of group that illustrates the data in a horizontal or vertical scrollable view. In react native Listview is deprecated, so most of the time FlatList is used in react. FlatList is  similar as ListView. In this tutorial we are going to learn how add the Horizontal FlatList in react native. DOWNLOAD SOURCE CODE FROM BELOW.

flatlist react native horizontal horizontal scroll react native flatlist react native scrollview horizontal flatlist

STEPS TO CREATE A REACT NATIVE PROJECT:
Step 1-> To create your project run this command:
sudo npm install -g react-native-cli
Step 2-> 
Now initialise your project name. Replace your project name with MovingScreen:
react-native init MovingScreen
Now you can start work on your React native project

HomeScreen.js
import React,{Component} from 'react' import {View,Text,StyleSheet,StatusBar, FlatList,TouchableOpacity,Alert} from 'react-native'
export default class HomeScreen extends Component{ state ={ category:[ {name:"Life isn't about finding yourself. Life is about creating yourself."}, {name:"The most important thing is to enjoy your life - to be happy - it's all that matters."}, {name:"Life is really simple, but we insist on making it complicated."}, {name:"We all have two lives. The second one starts when we realize we only have one."}, { name:"When one door closes, another opens; but we often look so long and so regretfully upon the closed door that we do not see the one that has opened for us."} ] }
render(){ return ( <View style={styles.container}> <StatusBar backgroundColor='#FF7043'></StatusBar> <View style={styles.headerContainer}> <Text style={styles.headerTxt}>Home Screen</Text> </View>
<View style={styles.mainContainer}> <FlatList horizontal data={this.state.category} keyExtractor={(item,index)=> index.toString()} ItemSeparatorComponent={this.listDivider} renderItem={this.customListView.bind(this)}></FlatList> </View> </View> ) }
customListView(rowdata){ return ( <TouchableOpacity style={styles.listContainer} onPress={()=>this.listClick(rowdata)}> <View > <Text style={styles.listTxt}>{rowdata.item.name}</Text> </View> </TouchableOpacity> ) }
listDivider(){ return ( <View style={styles.dividerContainer}></View> ) }

listClick(rowdata){ Alert.alert(rowdata.item.name) } }
const styles = StyleSheet.create({ container:{ flex:1, },
headerContainer:{ height:40, backgroundColor:'#FF5722', width:'100%', justifyContent:'center', alignItems:'center' },
headerTxt:{ fontSize:13, color:'white' },
listContainer:{ width:250, height:250, padding:10, justifyContent:'center', alignItems:'center', alignSelf:'center', backgroundColor:'#EAEAEA' },
mainContainer:{ flex:1, padding:10, justifyContent:'center', alignItems:'center', alignSelf:'center', alignContent:'center', },
dividerContainer:{ width:10, height:1, },
listTxt:{ color:'#FF5722', fontSize:13, } })


DOWNLOAD SOURCE CODE FROM HERE

Sunday, March 3, 2019

Video Demo:

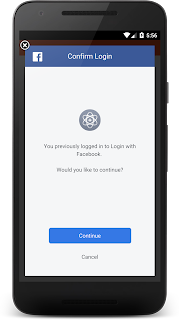
This article is about facebook integration in your react native application. Nowadays my applications are using Facebook login to register user in their application. The fbsdk library is a simplest way for Facebook integration in react native. DOWNLOAD SOURCE CODE FROM BELOW.

how to facebook login in react native facebook login react native

react native facebook login tutorial facebook login using react native

STEPS TO CREATE A REACT NATIVE PROJECT:

Step 1-> To create your project run this command:
sudo npm install -g react-native-cli
Step 2-> 
Now initialise your project name. Replace your project name with MovingScreen:
react-native init MovingScreen
Step 3->
Install Facebook library in your project:
react-native install react-native-fbsdk
Step 4->
Link this library with your native project
react-native link react-native-fbsdk

Configuration for Android:

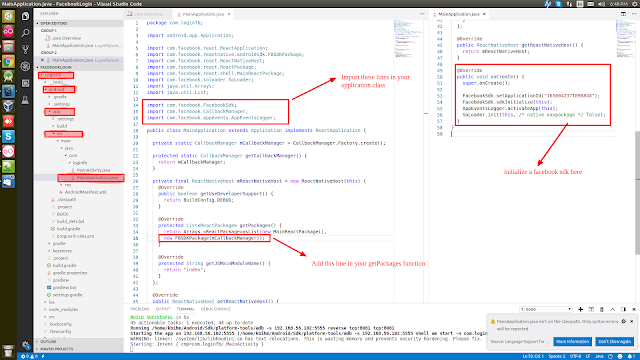
Step 1-> Add the following lines in your MainApplication.java class
Path-> ProjectName-> android->app->src->MainApplication.java

facebook login in react native android MainApplication.java

package com.loginfb; import android.app.Application; import com.facebook.react.ReactApplication; import com.facebook.reactnative.androidsdk.FBSDKPackage; import com.facebook.react.ReactNativeHost; import com.facebook.react.ReactPackage; import com.facebook.react.shell.MainReactPackage; import com.facebook.soloader.SoLoader; import java.util.Arrays; import java.util.List; import com.facebook.FacebookSdk; import com.facebook.CallbackManager; import com.facebook.appevents.AppEventsLogger;
public class MainApplication extends Application implements ReactApplication {
private static CallbackManager mCallbackManager = CallbackManager.Factory.create();
protected static CallbackManager getCallbackManager() { return mCallbackManager; }
private final ReactNativeHost mReactNativeHost = new ReactNativeHost(this) { @Override public boolean getUseDeveloperSupport() { return BuildConfig.DEBUG; }
@Override protected List<ReactPackage> getPackages() { return Arrays.<ReactPackage>asList(new MainReactPackage(), new FBSDKPackage(mCallbackManager)); }
@Override protected String getJSMainModuleName() { return "index"; } };
@Override public ReactNativeHost getReactNativeHost() { return mReactNativeHost; }
@Override public void onCreate() { super.onCreate(); FacebookSdk.setApplicationId("1650042371898848"); FacebookSdk.sdkInitialize(this); AppEventsLogger.activateApp(this); SoLoader.init(this, /* native exopackage */ false); } }


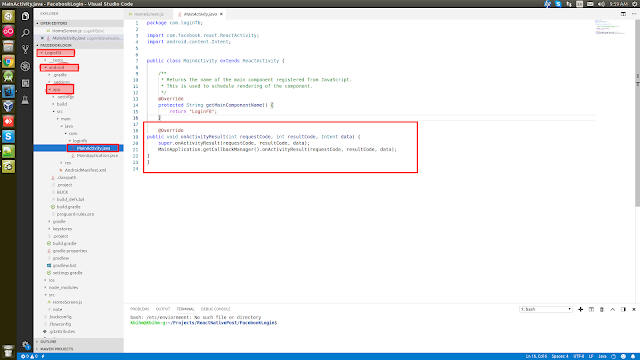
Step 2 Add Facebook callback on your MainActivity.java
Path-> ProjectName-> android->app->src->MainActivity.java facebook login for react native MainActivity.java

package com.loginfb; import com.facebook.react.ReactActivity; import android.content.Intent;
public class MainActivity extends ReactActivity { /** * Returns the name of the main component registered from JavaScript. * This is used to schedule rendering of the component. */ @Override protected String getMainComponentName() { return "LoginFB"; }
@Override public void onActivityResult(int requestCode, int resultCode, Intent data) { super.onActivityResult(requestCode, resultCode, data); MainApplication.getCallbackManager().onActivityResult(requestCode, resultCode, data); } }


For IOS Facebook configuration please follow this link https://github.com/facebook/react-native-fbsdk 

Now you can start work on your React native project 


HomeScreen.js

import React, {Component} from 'react' import {View, StyleSheet, Text,Button,Image, StatusBar} from 'react-native' import {AccessToken,GraphRequest,GraphRequestManager, LoginManager} from 'react-native-fbsdk'
export default class HomeScreen extends Component {
state = { facebookLogin:false, name:'', email:'', image:'no', }
facbookLogout(){ let context = this LoginManager.logOut() this.setState({ facebookLogin:false, name:'', email:'', image:'no' }) }
facebookLoginfunctionality (){ var accessTokenValue=''; var context = this; LoginManager.logInWithReadPermissions(['email', 'public_profile']).then( function (result){ if (result.isCancelled){ console.log("request cancel") }else{ console.log('result' + result.toString()) AccessToken.getCurrentAccessToken().then( function (data){ console.log(data.accessToken.toString()) accessTokenValue= data.accessToken.toString()
const graphRequest = new GraphRequest('me/',{ accessToken: accessTokenValue, parameters: { 'fields': { 'string' : 'email,name,picture.type(large)' } } }, (error,result)=>{ if(error){ console.log("error profile login") }else{ console.log(result.picture.data.url) context.setState( {facebookLogin:true, name:result.name, email:result.email, image:result.picture.data.url
} ) } })
new GraphRequestManager().addRequest(graphRequest).start()
} ) } },
function(error){ console.log('error '+ error.toString()) } ) }
render(){ return( <View style={styles.container}>
<StatusBar backgroundColor='#FF7043'></StatusBar> <View style={styles.headerContainer}> <Text style={styles.headerTxt}>Home Screen</Text> </View>
<View style={styles.mainContainer}> <View style= {this.state.facebookLogin?style={display:'none'}:styles.loginContainer}> <View style={styles.btnContianer}> <Button color="#4267B2" title="Login" onPress={this.facebookLoginfunctionality.bind(this)} ></Button> </View> </View>
<View style={this.state.facebookLogin? styles.loginContainer: style={display:'none'}}> <Image style={styles.profileImage} source={{uri:this.state.image}}></Image> <Text style={styles.profileTxt}>{this.state.name}</Text> <Text style={styles.profileTxt}>{this.state.email}</Text> <View style={styles.btnContianer}> <Button backgroundColor="#4267B2" color="#4267B2" title="Logout" onPress={this.facbookLogout.bind(this)} ></Button> </View> </View> </View> </View> ) }
}
const styles= StyleSheet.create({ container:{ flex:1 }, headerContainer:{ backgroundColor:'#FF5722', height:40, justifyContent:'center', alignItems:'center' }, headerTxt:{ color:'white', fontSize:13 },
mainContainer:{ flex:1, backgroundColor:'white', justifyContent:'center', alignItems:'center' },
loginContainer:{ flex:1, backgroundColor:'white', justifyContent:'center', alignItems:'center', alignSelf:'center', },
profileImage:{ height:50, width:50, margin:10, }, profileTxt:{ fontSize:13, color:'black', marginBottom:10 },
btnContianer:{ width: 200, height: 30, } })


Download source code from here